

How to Run A/B Split Tests That Make You More Money!!
The quickest and easiest way to maximize the revenue on your ecommerce store is through A/B split tests. If run correctly, they can skyrocket your store from low profiting to extremely high profiting very quickly. If they are run incorrectly, and they often are, they will cause more harm than good.
I’m going to show you exactly how to run successful split tests and what I’ve done to find massive wins that have made my clients an additional six figures a month. If you stick around until the end, you’ll have the precise tools required to run split tests correctly and maximize your own profits.
Just so you can see the true power of split testing, here’s a quick example of what running a single split test can do.
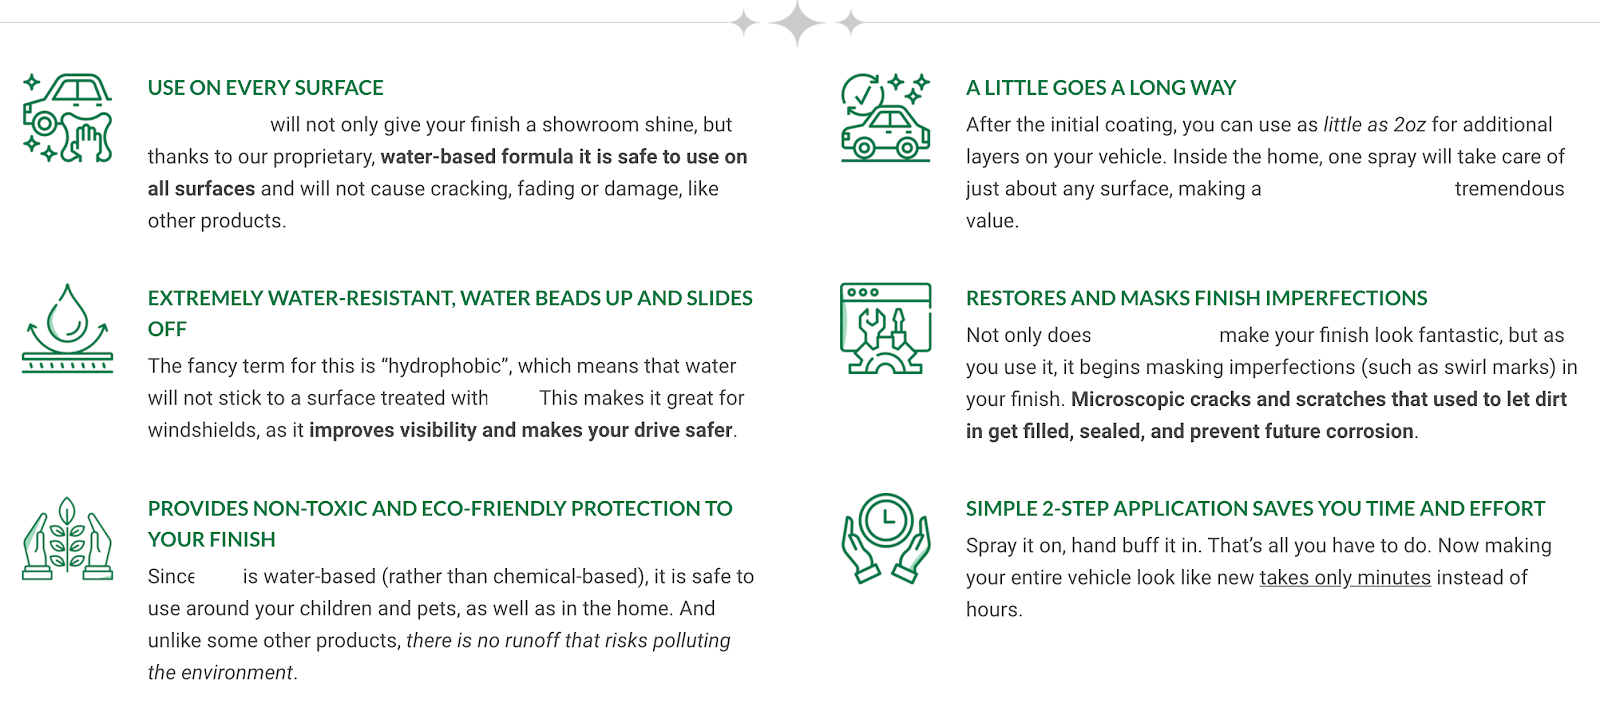
By simply replacing the original product description full of bullet points and walls of text with icons that could be easily read, I found a significant win.
Now see how much difference a single split test can make.
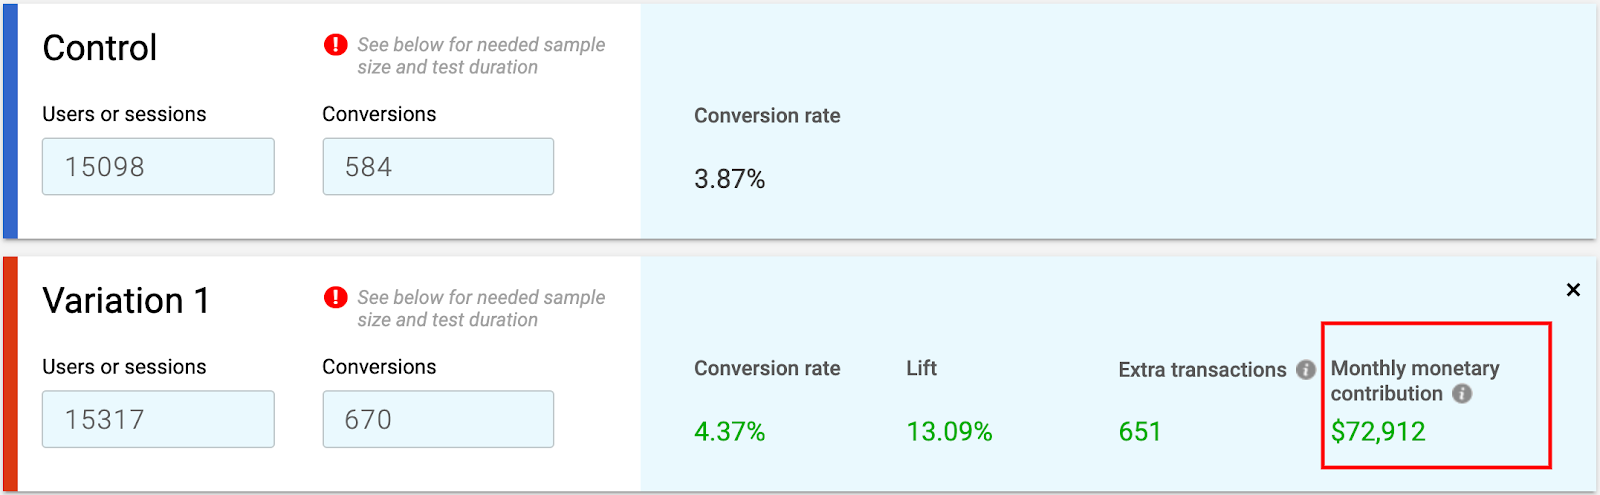
As you can see here, this simple test raised the conversion rate of the product pages by over 13%, resulting in $72,912 more dollars in monthly revenue. And that’s all from a single A/B test!
Keep reading to see exactly how to do this yourself.
Where Do I Start?
Let’s get started with what a split test actually is. The technical definition of an ecommerce A/B split test is a controlled experiment that has an end goal of improving one or more specific metrics on a website. It’s basically a test of a new variation of a page, pop-up, product description, or anything that needs to be tested against a control.
These metrics can be anything—gathering more emails, getting more clicks on a certain button, converting more customers, or any specific goal you have in mind. Whatever that goal may be, split testing will provide you with a better understanding of what should be on your website.
A good test will figure out exactly what your customers want to see the most and how to utilize that to improve your specific goal or metric.
So why create a split test instead of just changing the site the way you think it should look and function? Why take the extra steps it takes to make a split test?
Here’s why: about 50% of our split tests (those run by the professionals) still fail.
Even if the test sounds rock solid and the chances of it losing are low, it’s still possible that it won’t work the way you think it will. That’s why we typically test everything just to make sure it’s a winner.
Note: The only exception to this rule is if it’s what we call a “no brainer,” like fixing an “Add to Cart” button that’s broken or adding a product description that was nonexistent before. You don’t have to test things like that.
The reason a lot of these tests fail is because we don’t know exactly what customers want to see—because we are not the customers, and neither are you. So never assume you know exactly what should be on your site. You’d be surprised at what ends up losing!
Though you can never guarantee a win, there are strategies we use that will maximize the chances of success. We created a checklist that we use before we start coding any test. Keep reading to see the exact checklist we use.
What Tools Do I Need to Start?
Before I get into the checklist, let’s first discuss the tools needed to run a clean split test.
First things first, you need a platform to run this through. Convert is my favorite option here. But there are a lot of great options such as Optimizely, VWO, Evolv Technologies, and so on. Another great option that’s completely free is Google Optimize.
If you’re looking for the best bang for your buck, I’d go with Convert. It’s incredibly easy to use and maintain, plus you don’t need to have any coding knowledge to get some simple tests going.
That brings me into my next point, if you’re looking to test bigger design or functionality changes, chances are, you’ll either need access to a developer or to have some coding skills yourself. Although Convert allows you to code simple tests without any coding knowledge, access to coding skills is still important if you’re looking to test bigger things, which I’d highly recommend and will get into later.
You’ll also need some ways to gather data on your customers. I’ll get into this later too, but know that access to Google Analytics, polls/surveys, customer-session recordings, or even Shopify analytics will be very useful for maximizing the value of your tests.
Now that we know what a split test is, let’s look at why they are vital to a successful ecommerce store. We’ll also look at the platforms needed to run them and how to actually run them with the checklist we’ve created at BGS over years of experience.
Split Testing Checklist
1. Gather data
As I was saying above, having a strategy to gather customer data is very important. All tests need to come from data; no tests should ever be done simply based on thinking they’ll win. This is the most important part when it comes to developing a split test.
One of my personal favorite ways to gather data for testing purposes is through polls or surveys. These allow you to gather specific data that comes directly from your customers. It doesn’t get much better than that.
Here’s a quick example: I ran a post-purchase survey asking customers what they liked most about a certain product and what their top questions about it were. I then gathered the top three aspects people liked and the top three questions they still had. I made six icons with short descriptions to go in the product description. This test absolutely crushed it! Why? Because it came straight from the customer!
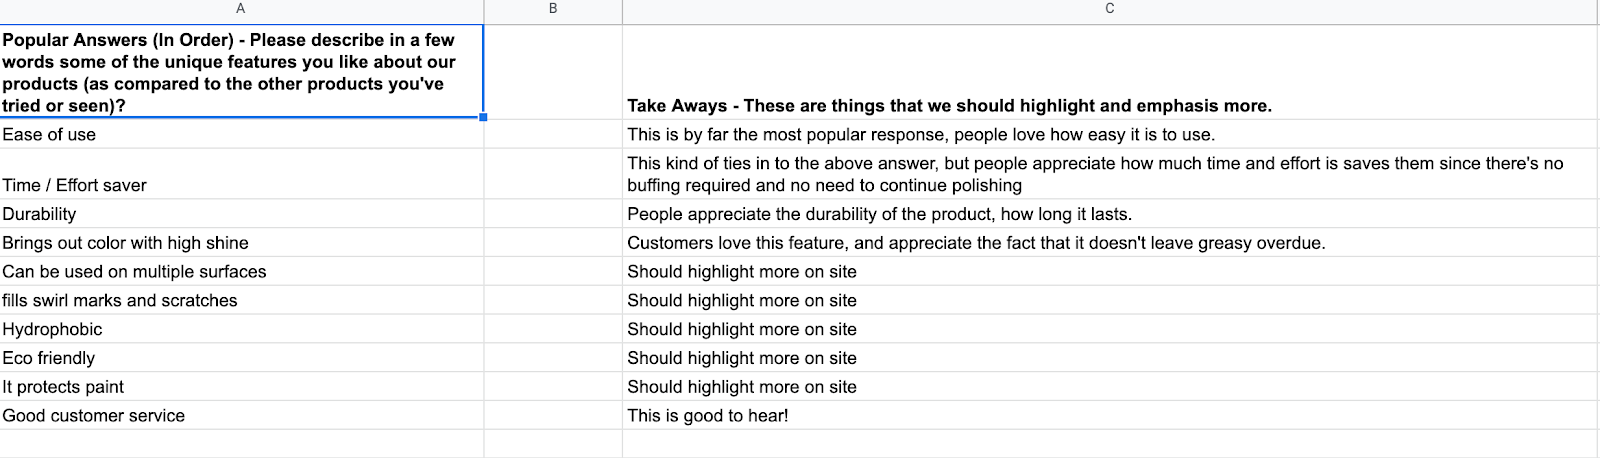
This is one question from the survey I used to find the massive win I shared at the beginning of the article.
By asking our customers what they liked about the product, I figured out exactly what I needed to put in the icons to crush the initial product description.
Another way to gather data is to use Google Analytics to look at what areas on a site are performing poorly and then testing different ways to improve those areas.
You can also use heat maps and customer-session recordings to see exactly how customers are interacting with your site. The possibilities are endless here, just make sure your tests are derived from data!
2. Develop ideas
Next you need to develop a bunch of ideas! This is basically just a brainstorming session. Take some time to brainstorm as many ideas as possible to fix the problem that you discovered by looking at the data. Write them all down somewhere where you have access to them.
Then begin a process of elimination until you dial it down to one or two really strong ideas. You can always code a multivariation test if it’s absolutely necessary. But ideally decide on one variation that you think will best solve the problem.
3. Develop a hypothesis
Once you decide on an idea, it’s time to develop a hypothesis in an “if–then–because” statement. If your idea can’t fit into this format, then you need to go back to the drawing table for a new idea.
Here’s a quick example: If UVP icons are added beneath the “Add to Cart” button, then the add-to-cart percentage will rise because I am addressing user concerns beneath the most valuable button on the page.
Don’t put too much thought into this. All this step does is to make sure you have a strong idea with solid reasoning behind it. If your test can’t be put in this format, chances are it isn’t a strong idea.
4. Is it a bold change?
To run a successful split test, you need to be testing a big and bold change. This step is also incredibly important.
Unless you have the traffic of Amazon, you shouldn’t test the color of your “Add to Cart” button or something similar to that. Instead, your tests should be bold changes that are clearly going to affect the customer persona.
That would include things like a redesign of a product page or a new product description, an Ajax versus a standard cart, a new homepage banner, a sticky banner throughout the site, or anything of this type. Don’t waste your time on tiny changes that won’t make any difference. Trust us—it isn’t worth it.
5. Does it reflect a change in user behavior?
This plays right into the previous step. In order to change user behavior, the test has to be big and bold!
Your customers don’t care if your product description font size is increased by a pixel or two, but they do care if the product description is completely rewritten to address all of their questions and concerns!
Change how the user behaves, and you’ll see massive results.
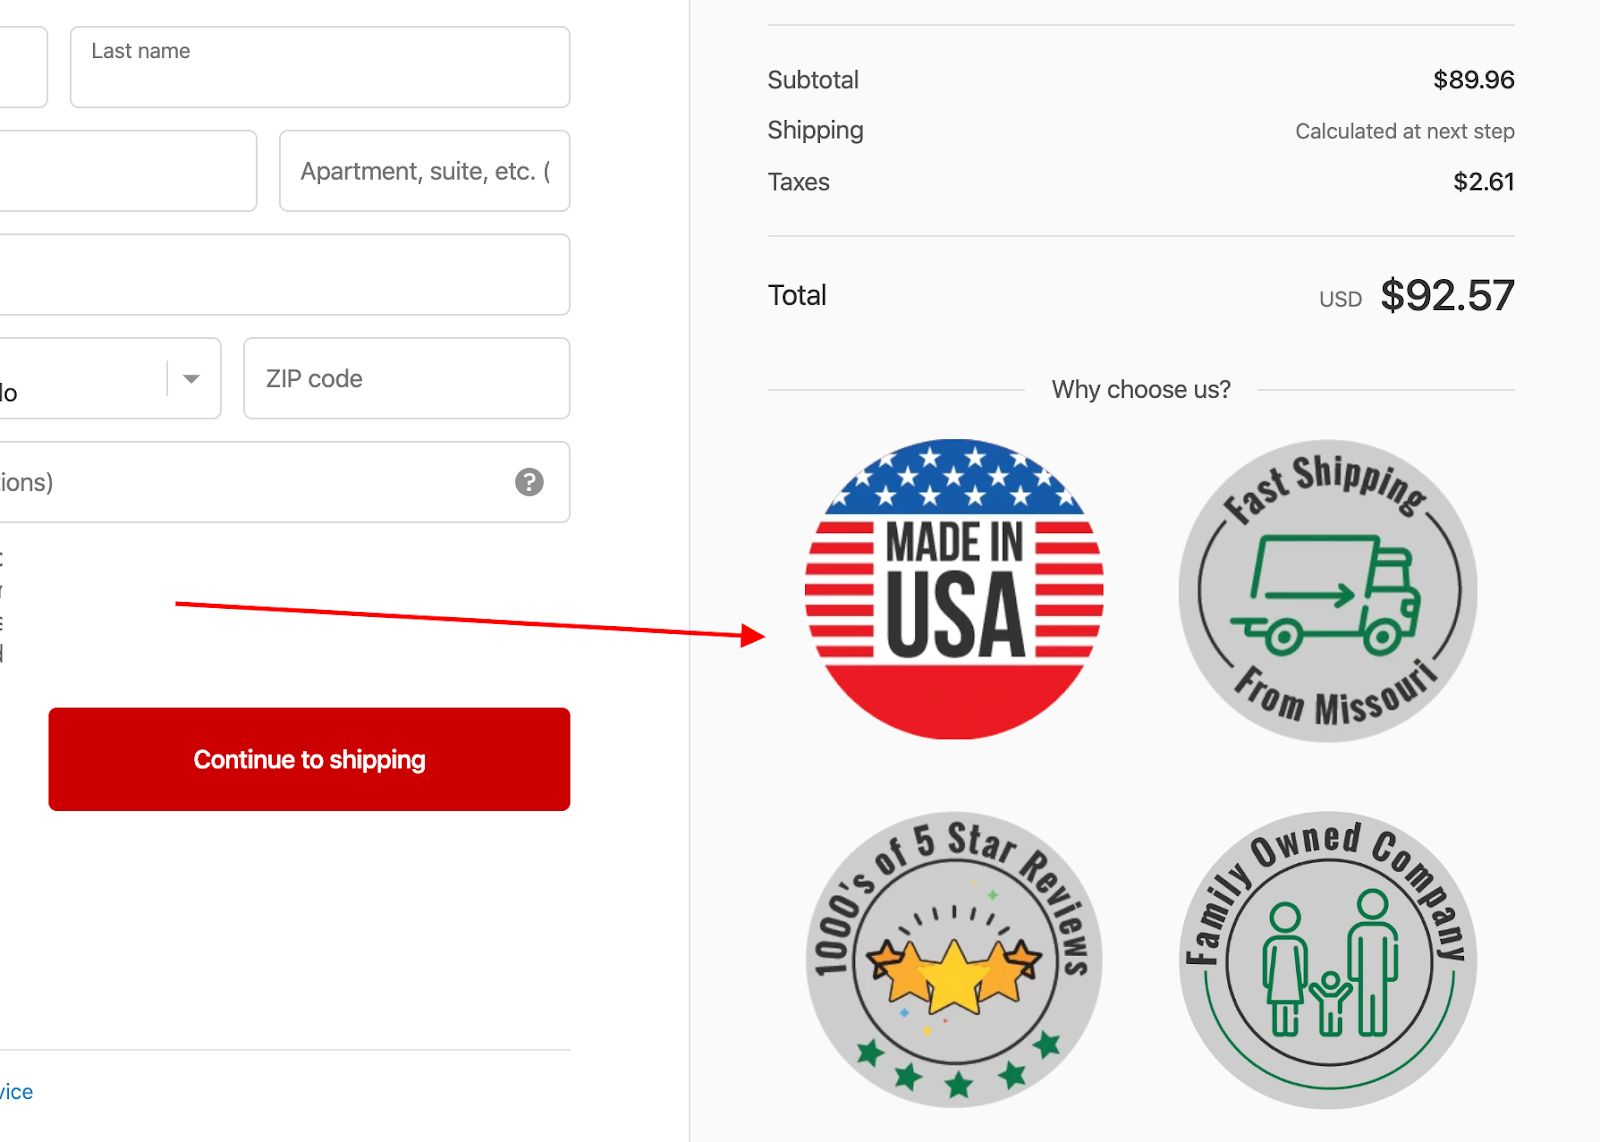
Here’s another example of a bold test we ran on the checkout page—testing UVP icons that were inspired from responses we got in a survey. As you can see, we didn’t test the color of the CTA button or how big the price is set. Instead, we added big colorful icons to address specific unique value propositions.
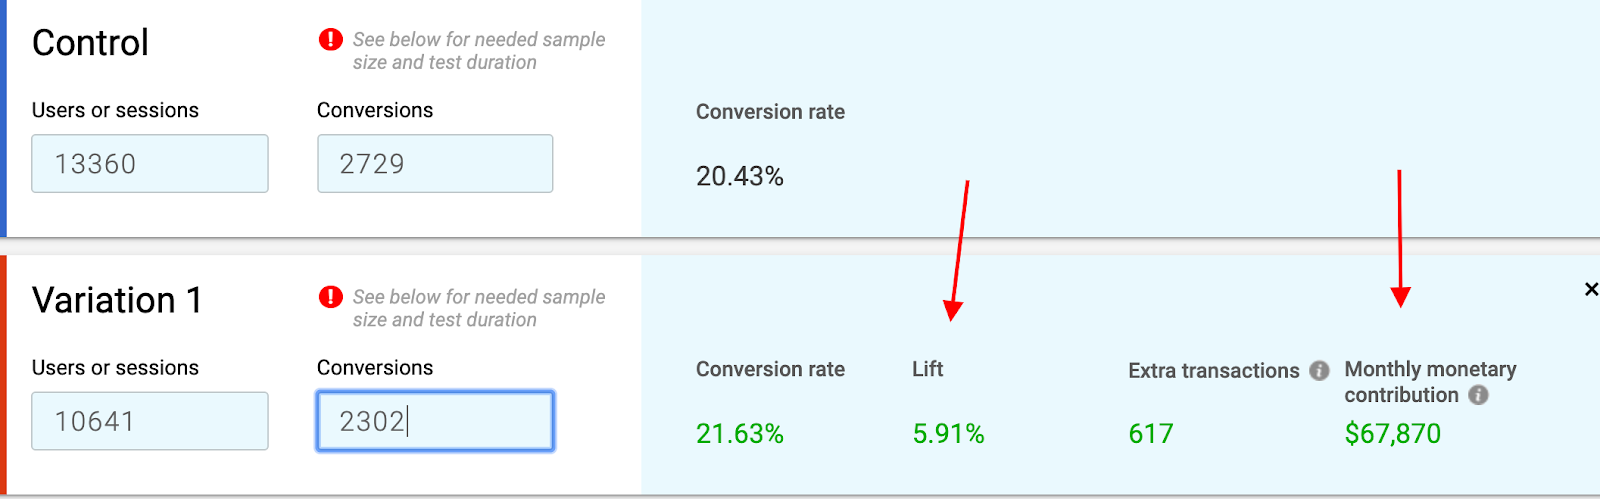
This test ended up killing it as well. Although it resulted in only a 5.9% lift in conversion rate, it contributed an additional $67,870 because of the high value of the checkout page. The main point is—test bold!
6. Is this solving a specific problem in a problem area?
Most ecommerce stores typically have their strong points, whether that be a good add-to-cart percentage, a solid reached-checkout percentage, or a good completed-checkout percentage.
But all stores have their weak points as well. You want to start in your store’s weakest area first. If you have a low ATC percentage, test on the product pages! If you have a low reached-checkout percentage, test on the cart! If the completed-checkout percentage is low, it’s because your checkout sucks, so test something new!
Always start on the weakest area of the site by trying to improve its related metric.
7. Is there enough traffic to reach significance in a given time frame?
Statistical significance is a monster of its own, as I’ll get into in the following paragraphs. But it’s basically the deciding factor for whether there’s enough data for a test to be considered done, or significant.
The more traffic that sees the test, the faster this goes. So make sure the pages seeing the test are getting at least a few hundred purchases a month or a few thousand views. If they don’t reach this standard, don’t test on this page as it will take way too long to be relevant.
Now That the Test Is Running, What’s Next?
Now that we’ve reviewed the checklist to make sure your test meets all the requirements, the next steps are to start the test, track it, and determine when to stop.
First things first: Make sure the test is hooked up to an analytics platform and is gathering data accurately. Some testing platforms have their own data interfaces built within them, but I always recommend going the route of connecting it to Google Analytics (GA) if possible.
This will provide accurate results on what variation is winning and by how much. Convert makes it incredibly easy to hook up with GA through custom dimensions. (If you don’t know what that means and need help in that area, check the support videos that most platforms provide. And if that doesn’t work, there’s nothing YouTube or Google can’t answer.)
Once your testing platform is all hooked up to analytics and gathering accurate data, you need to wait until your test is statistically significant. Fortunately, there are a ton of tools available to help with this. My favorite and the most accurate tool is CXL’s Conversion Calculator.
This allows you to enter each variation’s number of sessions and transactions, and the calculator will spit out how much longer the test needs to run and how many more sessions are required before the test is significant. It will even show you how much monthly monetary contribution that individual test will make once it’s significant and ready to be pushed. It’s pretty cool.
Once the test is complete and statistically significant, the last step is to code the winning variation on the live site.
I’m sure you’re already able to see the compound effect that split testing has the potential to reach. I’ve personally seen this take a store from a 0.5% conversion rate, to above 5% on a daily basis.
The best part about split testing is how easy it is to find huge wins! Once the data is in your hands, the possibilities are endless. Take this new knowledge and make sure you use it as soon as you can. There’s no better time than right now. This is proven to work wonders, so take advantage of it.
Thanks for the read, and have a great rest of your day.
For more information on running A/B Split Tests read related blog posts: 5 Common A/B Testing Mistakes Every Shopify Store Owner Needs to Know and 7 Things To Do If You Don’t Have Enough Traffic to A/B Test


About the author
Dominik Meiu
Dominik is a Revenue Optimization expert for Build Grow Scale. He loves the bright environment the team provides and the fact that he can have fun at work. The source of his incredible powers and critical game-changing ideas lay in his beautiful, luxurious, and youthful head of hair.